Search This Blog

Roll Out Writing


Roll Out Writing

You Will Need:


• Oven bake clay
• Rolling pin
• Varnish
• Card


•   Start by getting your finger tips on two different colours of oven bake clay. You can buy this from most art and craft shops.
•   Roll a ball of clay into a thick sausage.

•   This will be the background colour of your sign.

•   To make the stretchy letters, roll the other colour of clay into a thin sausage shape.

•   Cut the sausage-shaped clay into little bits with a blunt knife.

•   Now build up the letters on the background with the little bits of clay.

•   It's a good idea to push the little bits into the clay quite firmly, so that they don't stick to the rolling pin.


•   When all the letters are on, use a rolling pin to gently and slowly roll the sausage out flat.
•   Once you're happy with your sign, you can bake it.

•   Put it on a baking tray and follow the instructions on the packet of clay.

•   After it's cooked and cooled down, give the sign a coat of clear varnish.

•   And when that's dry, stick the sign onto a piece of card.

•   Finally, put a couple of sticky pads on the back of the card so that you can stick the sign on the door.
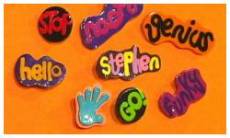
•   And you don't have to stop at door signs!

•   Why not have a go at making some badges like these? Just attach a safety pin to the back.

•   Or use the signs to personalise your school books.

•   Or go large and make a desk plaque!

•   So get rolling and stretch your creative skills with Finger Tips Roll Out Writing.


  • Digg
  • Del.icio.us
  • StumbleUpon
  • Reddit
  • RSS

Totally Organised Totem


Totally Organised Totem

You will need:


• lots of crisp tubes,
• cardboard,
• empty sweets tubes,
• egg box,


•   The first thing to do is draw around the base of a crisp tube onto the piece of cardboard.
•   Cut the circle out, so that you're left with a disc of cardboard. You'll need one cardboard disc for every crisp tube that you're going to use.

•   The next thing to do is connect the cardboard discs to the lid of the crisp tube. The easiest way to do this is to get some modelling clay and a sharp pencil, and carefully make a hole through both.

•   Thread a paper fastener through the hole to attach the cardboard disc to the lid of the crisp tube. Secure in place by opening out the arms on the back of the paper fastener.

            •   Now you can glue the lid with the cardboard disc onto the base of the crisp tube, ready for stacking!
•   The lids on the crisp tubes fit quite tightly. So, to make them a better fit, just carefully trim off the rim of the crisp tube.

•   To make the facial detail, cut some circles of card for eyes and stick them on with strips of newspaper and PVA glue pasted on. The nose is made from the end of the sweet tube.

•   The hands are cut from card and have little flaps folded into the arms, so that they can be bent round and stuck on at a right angle. Remember to leave a gap at the top of the crisp tube so that the next one can be stacked on top.

•   There are lots of design possibilities - but this one is called Buffalo Bill!Here's how he's made...
•   Get yourself an egg box. Carefully cut off two knobbly bits for horns.

•   and cut out one of the eggcups to make a nose.

•   Again, you can secure in place using strips of newspaper and PVA glue, pasted on.

•   Paint each pot with a coat of woody brown paint and add other bright colours by using your imagination.


  • Digg
  • Del.icio.us
  • StumbleUpon
  • Reddit
  • RSS

Plate Puppet Dragon


Plate Puppet Dragon

A green dragon made from a paper plate
All you need is paper plates, glue, tape and paper.

What to do:

Step 1

Part 1
Gather together all the things that you need to make the Plate Puppet Dragon.

Step 2

Part 2
Fold the red plate and green plate in half to make a mouth and head. Use some glue around the edges to stick half the green plate to half the red plate and leave to dry.

Step 3

Part 3
Carefully use scissors to cut the other green plate in half. Stick one half of the green plate to the other half of your red plate – make sure you only glue around the edges. Using the other half of the green plate, carefully, cut out two pointy shapes to make the dragon’s ears.

Step 4

Part 4
Stick the ears on to the dragon using sticky tape.

Step 5

Part 5
Draw two eyes and two pointy teeth onto white paper and carefully cut them out. Now using pink paper draw a long tongue and two nostrils and again carefully cut these out.

Step 6

Part 6
Finally, stick all your bits onto your puppet. Put your hand inside the mouth and there you have your very own paper plate dragon!
This should take about 30 mins

You will need:

  • Sticky tape
  • Glue
  • Pink and white coloured paper
  • Three paper plates - two green and one red
Remember to ask aGrown-up for help.

  • Digg
  • Del.icio.us
  • StumbleUpon
  • Reddit
  • RSS

X- Ray Telescope


X- Ray Telescope

You will need:


• A sweet tube
• A round chip cone
• Some lolly pop sticks
• Some black and silver card or paint


•   Take a sweet tube and carefully cut it, a third of the way down.
•   Flatten out the small part and cut a semi circle out of either end.

•   Put the two pieces of sweet tube together like this.

•   The semi circles you cut into the smaller part will help it join.

•   Paint the whole thing, or cover it in silver and black card.

•   To make the stand, stick three sweet tubes around a chip cone in a tripod formation, and glue some lolly sticks on the tubes.

•   aint it all however you like.

•   Balance your telescope on top of the stand. You could add some film canister lids for extra effect.

         
•   Now it's ready to use! Look through the telescope, placing your hand to the side of it.
•   It will look as though there's a hole in your hand!

•   It's so x-traordinary you could fool an astronomer!

  • Digg
  • Del.icio.us
  • StumbleUpon
  • Reddit
  • RSS

Animation Projector


Animation Projector

You will need:


• Paper dinner plate
• Modelling clay


•   Start by cutting two slits about 4cm deep and 1cm apart at the north, south, east and west points on the paper dinner plate.
•   Now, tear out the four bits of paper plate that are between the slits you've made.

•   Put a loop of sticky tape onto the paper plate.

•   Then take the pencil and make a hole in the centre of the plate. Press the pencil through the plate, but remember to put the modelling clay underneath to protect the work surface!

         
•   When the hole is made, leave the pencil through it.
•   You've made an animation projector!

•   To make it work, you need a four picture cartoon, drawn onto a circle of card and stuck onto the flat bit of the plate.

•   To see the projector work you'll need to find a well-lit mirror.

•   Hold the projector in front of your face. Look at the mirror through the top slit in the plate.

•   Focus on the top picture, and keep looking at it. Spin the plate, and you'll see the image animate.

  • Digg
  • Del.icio.us
  • StumbleUpon
  • Reddit
  • RSS

Magic Money Box


Magic Money Box

You will need:


• mirror card
• clear plastic box


•   To make one, you need to get your finger tips on a clear plastic box. This one used to contain greetings cards. If you can't find one of those, anything similar will work - like a tissue box, although you'd need to cut one face off.
•   Next you'll need three squares of mirror card. Make these by drawing round the side of the box and then cut them out.

•   Stick the 3 squares of mirror card in the box like this - make sure the mirror is facing inwards, and don't leave any gaps.

•   Then cover the box with some coloured card. Leave the front face clear.

•   In the top, cut a slit that's big enough to put your coins through. Make sure there's room for the biggest type of coin.
•   With a ruler, measure the diagonal of one side. Also measure the width.
•   Then cut out another piece of mirror card to those measurements. It should be a rectangle.

•   Reinforce this piece of mirror card with more card, so that it won't bend.

•   Now draw a symmetrical shape - like this star - on a piece of card. The illusion looks best with symmetrical shapes. When they're reflected they look the same, and not back to front.

•   Draw 3 identical patterns and then cut them out. You could add some extra detail to make them more colourful.

           
•   Stick the shapes to the three bits of mirror card in the box.
•   Then slide in the other piece of mirror card.

•   The illusion now works - suddenly it looks like box has a pattern on the back as well as the bottom and sides. The mirror card looks like it's disappeared.

•   So when you put your money into the top, it vanishes. Have a go at making one and see what a stash of coins you can get in the secret compartment.


  • Digg
  • Del.icio.us
  • StumbleUpon
  • Reddit
  • RSS

Filler Frame


Filler Frame

You will need:


• frame,
• tiling grout,
• tile, paint,
• plastic knife,
• bead,
• marbles,
• mosaic,
• coin


•   Scoop some grout onto a plate. You'll need as much as you think you'll need to cover the frame.
•   It is possible to buy coloured grout in the shops but why not colour it yourself just by adding some acrylic paint? Give it a good mix.

•   Now you can paste the mixture onto your frame. Do this with a plastic knife and don't worry if any goes onto the glass because you can just wipe it away with a damp cloth to leave a smooth edge.

•   Keep going right the way around, until your frame is completely covered.

         •   Whilst the grout is still wet you can decorate the frame. Use anything you like - beads, marbles, mosaic tiles - it's entirely up to you.
•   To finish, all you have to do is leave it to dry.

•   For another idea, cover a frame with uncoloured grout and then paint it then sand over the top to get a cool, streaky effect!

•   Or why not make a frame for your holiday photos by recycling your left over foreign coins?


  • Digg
  • Del.icio.us
  • StumbleUpon
  • Reddit
  • RSS

Load of pants laundry bin


Load of pants laundry bin

You will need:

• Pizza box
• Sweet tub
• Large cardboard box
• Shower gel
• Paint


•   Here's a funky looking dirty laundry bin in the shape of a washing machine!
•   To make it, start by cutting down a takeaway pizza box, so that you have just the lid and side flaps, like this.

•   Draw round the base of a shallow round sweet tub, and carefully cut the circle.

•   Now draw round the shallow sweet tub again, but this time on the pizza base.

•   Carfully cut out, so that you have a ring of card.

•   Stick the ring of card onto the cut-down pizza box lid.

•   That completes the door.

•   Next, fold in the flaps, and draw round the shape on the big box.


•   Cut the shape out carefully.
•   You can throw the piece that you cut out away.

•   Now you can glue the hinge part of the door (one of the edges of the pizza box lid) to the large cardboard box, slotting all the flaps into the hole you just cut.

•   Fill the sweet tub with shower gel, to look like water in the washing machine drum.

•   Using PVA on the rim, glue the lid on securely and stick it onto the door.

           
•   You can paint your Load Of Pants Laundry Bin any colour you like, and make them any size     depending on how many clothes you've got, and what size box you can find.
•   You could stick on bottle top lids as controls.


  • Digg
  • Del.icio.us
  • StumbleUpon
  • Reddit
  • RSS

Magnetic bookmark


Magnetic bookmark

You will need:


• A piece of paper
• Two magnets
• A ruler
• A pencil


•   Draw a ruler width line down the long side of the paper, like this.
•   Cut along the line with a pair of scissors.

•   Stick a magnet at either end of the strip of paper.

•   Now fold the strip in half and attach one magnet to one side of the page and the other magnet to the other side of the page.

•   The bookmark will never fall out. Brilliant!


  • Digg
  • Del.icio.us
  • StumbleUpon
  • Reddit
  • RSS

Fila foam


Fila foam

You will need:

• Fila foam - available from art and craft shops.


•   Begin by folding a piece of fila foam in half. Make some little scissor snips in each corner, but be careful not to cut right to the edge.
•   Do the other side too.

•   Open out the fila foam, and fix an elastic band round each of the slit corners.

•   Slip the corner covers of a book under the elastic bands.

•   You can make these book covers in any design - even using card if you haven't got any fila foam.


  • Digg
  • Del.icio.us
  • StumbleUpon
  • Reddit
  • RSS

Alien Eyes


Alien Eyes

Cake cases with dots in the centre on pipe cleaners
Have a quick go at this Minute Make.

What to do:

Step 1

Part 1
Gather together all the things that you need to make the Alien Eyes.

Step 2

Part 2
Get the plastic hair band and a pipe cleaner. Twist one end of the pipe cleaner to the hair band and do the same with the other.

Step 3

Part 3
Move the hairband to the side and get your cake cases. Draw black dots on to make the eyes.

Step 4

Part 4
Stick on the eyes by putting some sticky tape on top of the pipe cleaners. Then stick the cake cases to the sticky tape.

Step 5

Part 5
Why not try making your eyes a different colour by colouring them in, or how about adding an extra eye to make three?
This should take about 30 mins

You will need:

  • Cakes cases
  • Pipe cleaners
  • A pen
  • A plastic hair band
  • Sticky tape
Remember to ask aGrown-up for help.

  • Digg
  • Del.icio.us
  • StumbleUpon
  • Reddit
  • RSS

Spoon Bug


Spoon Bug

A ladybird made from a spoon and cotton buds
Why not have a go at making a Ladybird Spoon Bug!

What to do:

Step 1

Part 1
Gather together all the things that you need to make the Spoon Bug.

Step 2

Part 2
Roll a lump of clay into a ball. Then squash and mould the clay ball into the plastic spoon to make a stone shape. Cut the cotton buds very carefully with scissors. Remember to ask an adult for help with this.

Step 3

Part 3
Stick the cotton buds into the clay to make bug legs and then leave to dry.

Step 4

Part 4
Once the clay is dry, slide the bug out of the spoon and turn it over. Finally, paint your bug any colour you like.
This should take about 5 mins

You will need:

  • A plastic spoon
  • Cotton buds
  • Scissors
  • Air-drying clay
Remember to ask aGrown-up for help.

  • Digg
  • Del.icio.us
  • StumbleUpon
  • Reddit
  • RSS

Totem Pole Holder


Totem Pole Holder

A picture of a monkey with ears
Keep all your bits and pieces in this holder.

What to do:

Step 1

Part 1
Gather together all the things that you need to make the Totem Pole Holder.

Step 2

Part 2
Paint all three crisp tubes white all over - this makes them easier to draw onto.

Step 3

Part 3
When they're dry you can draw on a design, maybe a rabbit! Give the rabbit some teeth, for eating his carrots!

Step 4

Part 4
Paint the rabbit any colour you want. Don't forget to paint his nose.

Step 5

Part 5
You can give your rabbit ears by sticking on two feathers on each side of the rabbits face with sticky tape. Stick them on the top and the side of the tube.

Step 6

Part 6
Put all your bits and pieces inside the holder. Paint and decorate the other tubes however you like. You could make an elephant and use a pipe cleaner as a trunk! Or a monkey using corks for his ears and painting him bright yellow.
This should take about 30 mins

You will need:

  • Three crisp tubes
  • Some coloured feathers
  • Some paint
  • A black felt tip pen
Remember to ask aGrown-up for help.

  • Digg
  • Del.icio.us
  • StumbleUpon
  • Reddit
  • RSS

One-Eyed Monster


One-Eyed Monster

A green monster with one eye
Have a quick go at this Minute Make.

What to do:

Step 1

Part 1
Gather together all the things that you need to make the Space Skittles.

Step 2

Part 2
To make your One-Eyed Monster get one big lump of clay and roll it into a ball, then squash it into the body shape of a monster. Then to make the monsters legs get two smaller lumps of clay and roll them into small sausage shapes. Now take the feather and stick it in the middle of the body shape, like it is coming out of his head. Take the googly eye and press it into the clay in the middle of the body shape.

Step 3

Part 3
To make his arms take the green card and draw two arm shapes. Then cut these out but be careful as scissors are very sharp. Now you need to press these into the clay. You can then paint your monster a nice bright colour and even make several different monsters.
This should take about 5 mins

You will need:

  • A feather
  • A pen
  • Some scissors
  • Some green card
  • A googly eye
  • Some air drying clay (available from an arts and crafts shop)
Remember to ask aGrown-up for help.

  • Digg
  • Del.icio.us
  • StumbleUpon
  • Reddit
  • RSS

Splatter Space Picture


Splatter Space Picture

A space picture featuring an alien
Make a space picture and put your own little alien in it.

What to do:

Step 1

Part 1
Gather together all the things that you need to make the Space Skittles. Then put on the apron and put some old paper or newspaper down as this make can be messy! Then mix some white paint with a little bit of water. Do the same with yellow paint and red paint to make three different runny paint mixtures. Don't forget to give them all a good stir.

Step 2

Part 2
Lay the black paper flat. This is the messy bit! Now take the old tooth brush and put it into the white paint mixture. Take the piece of card and now hold the toothbrush at the bottom of the paper and with the card, scrape towards you. Keep going until the black paper is covered in splatters. Then leave it to dry.

Step 3

Part 3
Take the piece of brown paper and start ripping out lumpy crater shapes. Put the crater shaped paper on top of your splattered piece of black paper. Then add some extra details with a black pen.

Step 4

Part 4
To add the extra planets in the background just splatter some red and orange paper with the red and yellow paint. Then draw around a circular object and cut it out. Be careful as scissors are very sharp. Do this as many times as you like, depending on how many planets you would like in your picture.

Step 5

Part 5
Now it's time to draw your alien. It can look however you would like it to. Then paint it and cut it out, being careful as scissors are sharp. When the paint has dried you can draw around your alien with a black pen. Place your alien on the picture poking up from behind one of the craters. Then glue everything down.
This should take about 15 mins

You will need:

  • Black, brown, red and orange paper
  • A pen
  • Paint and some water
  • Sticky tape
  • An old toothbrush
  • A piece of card
  • Something circular to draw around like a cup
  • An apron / old clothes
  • Old paper / newspaper
Remember to ask aGrown-up for help.

  • Digg
  • Del.icio.us
  • StumbleUpon
  • Reddit
  • RSS

Gruesome Jars


Gruesome Jars

A glass jar with a hand on top of the lid
You can store your things in this Gruesome Jar!

What to do:

Step 1

Part 1
Gather together all the things that you need to make the Gruesome Jars.

Step 2

Part 2
Take your ball of air drying clay and using the rolling pin roll it out on to an old tray. Make sure you roll out enough clay to fit your whole hand on it. Place your hand on the clay and taking a pencil carefully draw around your hand, pushing the pencil firmly into the clay. You need to be careful when doing this so you may want to ask an adult to help. Make sure you draw a bit bigger than the size of your hand, so it looks even more monster like! You will now have cut out the shape of your hand in the clay, so very carefully peel away the rest of the clay around the hand shape.

Step 3

Part 3
Taking the plastic jar put the clay hand on top. Very carefully bend the fingers of the clay around the jar but make sure you can still unscrew the lid. It will look like the hand is hanging onto the jar. Now squash the fingers a little so they look a little more life-like. You can put some blobs of clay on to the hand and the bony parts of the fingers. Then squeeze the end of the fingers to create fingernails. Finally, leave the hand until it is nearly dry.

Step 4

Part 4
Now using the paint you can paint the hand, including the underneath. Then leave this to dry. When it is dry you need to stick your gruesome hand on top of the lid using the PVA glue. Then cover the whole hand in PVA glue as it makes it extra strong. When it is all dry you can then fill the jar with whatever you like!
This should take about 30 mins

You will need:

  • A plastic jar
  • Some coloured paint
  • A pencil
  • Some paint brushes
  • Some PVA glue
  • A rolling pin
  • An old tray
  • Some air drying clay (you can get this from an arts and crafts shop)
Remember to ask aGrown-up for help.

  • Digg
  • Del.icio.us
  • StumbleUpon
  • Reddit
  • RSS

Stretchy Picture


Stretchy Picture

A picture of a lorry
Just fold some paper to create a Stretchy Picture.

What to do:

Step 1

Part 1
Gather together all the things that you need to make the Stretchy Picture.

Step 2

Part 2
Draw the front of the lorry. Start by drawing around the circular object for the wheel. Now draw the back of the lorry. Cut out the front and back of the lorry.

Step 3

Part 3
To make the middle stretchy part take the piece of rectangular paper and fold it over, then fold it back on itself. Continue until you have folded the whole sheet. Now unfold the paper and stick the front and back of the lorry to either end. Using the black pen draw on the detail. You can also make a stretchy train picture.
This should take about 15 mins

You will need:

  • Brightly coloured paper
  • Some scissors
  • A glue stick
  • A silver pen
  • A black pen
  • Something circular to draw around
Remember to ask aGrown-up for help.

  • Digg
  • Del.icio.us
  • StumbleUpon
  • Reddit
  • RSS